Showing posts with label Data Migration. Show all posts

Tuesday, October 18, 2011

SQL Server: How to Import Data from Pervasive


To extract data from pervasive data files Pervasive database Engine is required. Latest Trial version 11 can be downloaded from http://www.pervasivedb.com/psqlv11/pages/default.aspx
Once you have installed pervasive Engine, follow following steps to view and import it into SQL Server.
1. Open Control Center through programs>Pervasive> PSQL v11> control Center and documentation.

2.       Make sure services pervasive PSQL Relational Engine and pervasive PSQL Transaction Engine are running (Expand services in Left panel)
3.       To open a database Expand Engines>[ server name] > Databases
4.       Right Click on Databases and select New>Database
5.       In Database Name Box give a name to your database.
6.       In Location Box locate the database files path.  (.mkd, .ddf, .dat)
7.       You can uncheck “relational integrity enforced”.
8.       Click Finish to complete the process.


 9.    Expand Database and you can see the added database.
10.   Double click on a table to see records
 

Moving data into SQL Server:
1.       Right click on target database and select Tasks> import data to open import and export wizard.
2.       Hit next on the welcome screen.

4.       To choose a data source click on the drop down list and select Pervasive Provider, Release 3.2
5.       Under Standard connection: specify pervasive Database Name, Host and server DSN as shown in figure below.  DSN DEMODATA is automatically created by Pervasive Engine.
6.       Click next.
7.       Chose SQL server native Client as Destination. Hit Next.
8.        Click next
9.     Provide Query to extract data from a given table. Click parse to verify. Click next
10.   Change Destination table name and click on Edit Mappings button.  You can also preview source data.
11.   In column mappings you can specify Field names, data type and size for destination table.
12.   Click "OK" button to close Column mappings and hit finish to execute the import process.
13.   On successful completion refresh database in SQL Server to see imported data.

Monday, July 25, 2011

SQL Server: Extracting Data from OpenEdge Progress without OLE DB Driver

Importing data from OpenEdge’s Progress® data base is simple if you have OLE DB data provider. But if you don’t have OLE DB driver or unable to configure it properly then there are few simple steps to migrate data from OpenEdge’s Progress® to SQL Server.
(Worst thing in Progress ® database I found that you can only restore your database from backup file with only version with which this backup files was created i.e. you can’t restore Progress 9.1 backup file on Progress 10 or newer version)
We will achieve our data migration goal through two step, first to import table structures and import data from flat files to newly created tables.
Copying Table Structuer:
Once you have restored your required backup file, you can access it from “Data Administrator” by connecting your database file.
 Progress normally keep its databases with extension “db” at installation drive\Progress\WRK\YourDatabaseName.db
Once you are connected to your desired database, click on “ProgressDB to M SQL Server” through given path.
Provide necessary information for ProgressDB to ODBC Conversion. Type any name of your choice for “Name of schema holder database” and correct ODBC data source name.

On pressing OK button, it will create “.sql” file on “installation drive\Progress\WRK\”. This sql file contains create table query for all database tables. Open this .sql file in SQL Server and create tables.


Extracting Data
In next step we will extract table data to CSV files.
Select table of your choice.
 Provide file name with target folder path. Select “All (Max 255)” fields to export. You can provide WHERE clause to filter output rows. Press OK button to proced
 Provide any record start string. It will add given string at start of each row. Which you can remove, once data is imported in SQL Server.
 Now you have tables structure and data in text format. Execute simple Data Import process to import your desired data from text files to already created tables.

Sunday, July 24, 2011

SQL Server: Import Data from Sybase Advatage (adt Files) using SSIS


In last post, we have learned to free a Sybase Advantage table (“adt” file) from its data dictionary, so we can import its data to SQL Server.
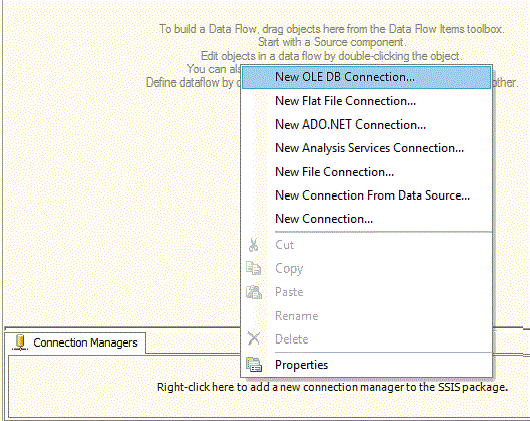
To extract these “adt” files by using SSIS package first we need a “New OLE DB Connection”.

Select “Advantage OLE DB Provider” as provider and complete folder address in “Server or file name” section. Use “adssys”  as user name and leave password blank. Don't forget to change server type value to "ads_local_server", by clicking on "ALL" button on left of connection Manager. In Initial catalog provide “adt” file name and press “Test Connection ” to test newly created connection.


Drag a new OLE DB Source

Double click “OLE DB Source” to open it in editor and provide OLE DB connection manager and name of required table.

Open properties page for “OLE DB Source” and mark TRUE to “AlwaysUseDefaultCodePage”

Now you are ready to import data from OLE DB Source to any type of destination. You can provide OLE DB Destination to insert data directly into a SQL Server database. In this demo we have use Flat File as destination.

Saturday, July 16, 2011

SQL Server: How to Import Data from Sybase Advantage (adt Files)


Sybase Advantage database create separate files for each table and its indexes. Table files are created with extension “adt”. One can import data from Sybase Advantage to SQL Server if she has
  • Access to adt files
  • Advantage OLE DB Provider
But import process is bit tricky because first you must free target “adt” files from its database dictionary, which can be achieved by using Advantage Data Architect. It can be downloaded from http://devzone.advantagedatabase.com/dz/content.aspx?Key=20&Release=16&Product=8&Platform=6 . Once you have install Advantage Data Architect, follow these step to free your target adt files.

1.       Click on new connection wizard

2.       Create a connection to a directory of existing tables

3.       Provide DatabaseName of your choice and then provide correct path of folder where adt files are located on your hard drive and press finish.

4.       Once you have created connection, it will start showing adt tables BUT still you can’t open or export these tables as these are bound to directory.

5.       To free these tables, click on Tools -- > Free Data Dictionary Bound Tables

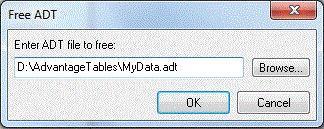
6.       Provide adt file name with its complete path and press OK button.

7.       Your adt table is now free. Now you can open it in Data Architect. You can export or you can close Data Architect and import this table from SQL Server Import Wizard.
Note: In next post, we will explore a simple method to import adt files by using SQL Server Integration Services Package.

In next post: How to import adt files by using SSIS package

Thursday, February 17, 2011

SQL Server: How to Migrate Data From Top Speed Database Files

I had never heard about Top Speed Database. But, my today’s task was, “to migrate data from TPS files to SQL Server2008”. I start collecting information but unfortunately there was no detailed information regarding these TPS files. But thanks to my team lead who always have some solution for such interesting tasks.
TPS Database File is an ISAM type file developed by the TopSpeed corporation primarily for use with the Clarion Development platform which is currently developed and distributed by Soft Velocity www.softvelocity.com.
To shift data from tps files, first we have to open these files, reformat some columns (Date and Time) and then we can shift data to some flat files.
Top Speed Database Scanner is used to open these files
Click on FILE - - >OPEN, to open a single tps file. Once the file is open you can select column of your choice from VIEW. Columns with data types date and time are stored separately in tps files. And before shifting we have to convert these date and time columns to some proper format other wise these date and time will look like simple integer.
For this purpose click on  COLUMN and then FORMAT DATABASE COLUMN, in picture field use @D17 or @D18 to format date column data, and then click OK button. Next select time column (if exists) and again select FORMAT DATABASE COLUMN. This time in picture field use @T3. Press OK button and you are done with formatting.
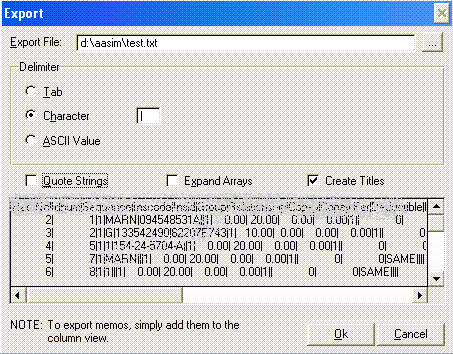
To export to a text file, move your pointer to FILE, and click EXPORT. Quote Strings is checked by default, unchecked it and also use a CHARACTER as separator. In my case I used pipe | sign. Now, for “Export File” provide name and path to valid text file and click OK button to export.

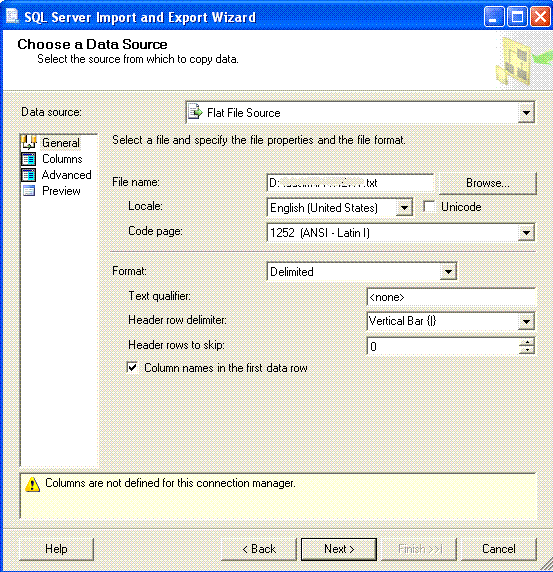
On SQL Server side, use import utility to import, use Flat File Source as data source and make necessary changes according to following screen shot, at choose a database source page.

Friday, February 11, 2011

SQL Server: How to Avoid Data Loss During Migration From MS Excel

While importing data from excel sheet, keep in mind that, SQL Server export/import utility look into first  row of your data in excel sheet to guess data types of different columns.  Problem occurs when we want to import columns, which contains both numeric and character data.
In above screen shot of ms excel data sheet, we have three columns, first one contains only numeric data, but second and third columns contains mix (numeric and character data), which in future we like to import as varchar or nvarchar.  If data type of cells in Excel is GENERAL (that is default). During data migration on column mapping page we can see that, utility made guess for data types according to data in first row. For example first cell of second column contains numeric data, that’s why utility guessed float as data type for whole column.
Check out the results, after import is complete. We lost the data for some rows in second and third columns. Because utility imported data that fits into data type criteria and left other. Problem still exists even if we change the data type during mapping.
Best way to resolve this problem is that we should change the data type of each cells, explicitly in Excel Sheet i.e. for columns which are supposed to contain numeric , data type should be number and for character it should be text. After changing data type explicitly in Excel sheet, mapping page will look like as follow.
Now check the results.